Pages

Monday, September 5, 2016

How to dry hot peppers on a string

At the end of may, I bought some hot pepper plants at the market. I thought it would be nice to have some fresh peppers to cook with this summer and fall. Little did I know, I would end up with many many more peppers than expected!


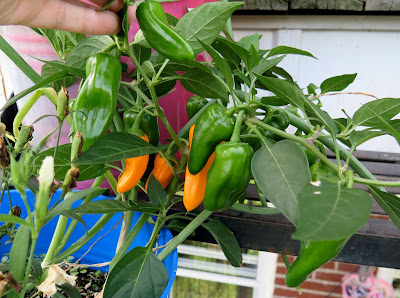
These are cheyenne peppers. As you can see, when ripe, they turn a bright orange. About their spiciness, I would say they're a bit more intense than the well known jalapeno peppers. The flesh is a bit thinner too. 


This is only one of my plants. I have 6 crazy productive plants like this one. You can imagine, I've been searching for ways to preserve these little gems.


I've plan to make some fermented hot sauce with a bunch of them, but today's harvest is going to hang in the kitchen to dry. Dried peppers can be used whole (I would split them first) in slow cooked meals or crushed into flakes. You could even turn them in a fine powder with a food processor or a coffee grinder. 

On the pictures, you can see that I also picked a little onion and some blooming oregano from the balcony. 


My first idea was to make a ristra but I didn't have enough peppers for that. So I kept looking for some more ideas. That's when I came across pictures of espelette peppers. Espelette is a french town where they grow a specific pepper since the mid sixteen hundreds. Traditionally, the red peppers were picked when ripe and threaded on strings to dry on the south facing side of homes. 
I liked how these pepper garlands look so I made something similar with my little cheyenne peppers. If you want to try it too, here is how to proceed.


All you need for that quick project is a biggish needle, cotton thread (I used the kind you can crochet with), scissors and fresh hot peppers. Try to find really fresh peppers, with long stems. This will prevent the stems from splitting or breaking and letting out the thread. 


 What I like about the espelette peppers arrangement, is the way the peppers are aligned in a flat way. The trick to insure you get that nice and tidy look, is to place the curve of the pepper stems all upwards. You see how they all point towards the top? That's what makes all the difference! It keeps the pepper above from spinning on the thread.


To thread your peppers, start by pre-arranging all of them. Cut a piece of cotton thread of two or three times the length of your garland. Starting with the bottom pepper, pierce the very base of the stem and pull the thread to three inches for it's end.


Wrap the end around the stem a couple times and make a knot. This pepper is the one keeping all the others from slipping, you want it to stay in place.


 You can cut the thread end shorter if you want, just make sure it won't undo the knot.


Continue threading the hot peppers one after the other. Always pierce the stem in a way that makes the curve go upward.


 Push them delicately on the thread, too much pressure or too fast a move could split or break the stem (the pepper would still be good! But you couldn't thread it back).


Once all the peppers are on the thread, knot a little loop at the end and suspend your garland somewhere dry and well ventilated. Check it from time to time for molds and take out any suspicious pepper. You can use the peppers at any stage of dryness, to your liking. 


Give it a try, and send me a picture! I would love to see your garland!


Sunday, August 28, 2016

6 Foods to can this Fall


All around me, I hear people say: No, not yet, not the end of summer already! But I, I don't mind because fall is my favorite season. Fresher days are perfect for cooking with open windows. Taking a long walk without toasting in the sun is nice too. The cool wind and the shorter days also bring back my knitting obsession! But that's not what I want to talk about today. Today, I want to show you my list of "must can" this coming season. Fall is, most of all, bounty season! So, it's time to use all those delicious and colorful fruits and vegetables. Put them in jars to preserve them for the months to come.


I based my list on my personal tastes but also on what I find to be a "good deal". I select canning recipes that contains mostly local and seasonal produces (remember, I live in eastern Canada). Also, it must be something I know we like to eat and that will be used within the next year. When canning, I find it important to choose ingredients and meals you know you eat regularly. Wasting home canned goods is not only wasting good food, it's also wasting your time and efforts!

So here it is, my list of 6 must can of the season!


Tomatoes

Diced, crushed, pureed or cooked in marinara sauce, tomatoes are just so versatile. I use them in homemade spaghetti sauce, casseroles and soups all the time. Canning tomatoes yourself means you can choose the type of tomatoes you prefer. Think italian tomatoes, yellow tomatoes, organic tomatoes, cherry tomatoes etc.


Vegetables in water

Just like the ones from the grocery store but better! Why better? Because they're made from vegetables that you choose yourself (local, organic or from your own garden!). Again, you choose, beets, carrots, beans, peas, potatoes etc. You even get to choose the color and the cut. Why not try yellow beets for a change or mix green and yellow beans in the same jar.

You ABSOLUTELY need a pressure canner to safely preserve these.


Fruits in syrup

Stone fruits come to mind first: Peaches, plums, apricots, pears and cherries. But berries can be preserved in syrup too. Strawberries, blueberries, gooseberries, even grapes and currants. I sometimes make jams, but I prefer fruits in syrup. The product is pretty (nice gift idea here!) and it's so good on sponge cake, pancakes, greek yogurt or oatmeal! For a little variety, try flavoring your syrup with a vanilla bean, a cinnamon stick or a citrus peel.


Applesauce

Apples are a staple of Quebec's fall. We grow many varieties. Some are sweet, others are tart. Some are better for cooking, others are at their best when eaten raw, but they're all delicious in their own way. I can applesauce in 500ml and 250ml jars to eat as a snack or to use in recipes (baking mostly). I can it plain, but you could add spices and sugar. Actually, adding two tablespoons of sugar per litre of product will extend it's life in the fridge once the jar is open.


Cubed winter squash

This one, I haven't tried yet. In the fall, I always go to the farmer's market and buy many winter squashes. I just love to see them so I decorate my apartment with them! When winter comes in, I end up with a ton of ziplock bags of pureed squash in my freezer. I do use them in soups and quick bread, but they take up space I would rather use for raw meat, seafood or bagels and bread. That's why I want to try canning cubed squash in water with my pressure canner and see if it makes good pie!


French onion soup

In fact, I want to try many kinds of soup in the pressure canner, but this one comes first! We love onion soup around here and onions are so cheap in the fall, I must give it a try. I want to try this recipe. I know, it's in french haha! If I like the result, I plan on sharing a translate version with you. This site is such a great resource. I've learned so much on pressure and water bath canning from this blogger, I wish everyone could read it!


There you have it, my priority list of foods to can this coming season. Have you tried any new canning recipe lately? What do you plan on canning this fall?

Sunday, July 10, 2016

Waste nothing: Strawberry stems syrup

Ahhh July! July in Montréal means the abundance of local fruits and vegetables. It means nice, warm and long summer days. A time for vacation, a time for contemplation, a time for taking the time.

For some years now I've wanted to make strawberry jam. Sadly local strawberries, strangely enough, are often more expensive than imported ones, and even more expensive than other local fruits. But boy are they worth your hard-earned dollars! Sweet, plump and so flavorful, they really are the joy of the season!

I've grab my box of strawberries will touring the Jean-Talon market, which is also a real joy at this time of year. All the smiling people, the wonderful smell of fresh produce and seeing the big piles of green onions, fresh herbs, huge lettuces and tons of berries made my day.  I bet you could get them at a better price if you can go directly to a producer near you though.

Traditional strawberry jam
Using fresh and local (and more expensive) produces really motivates me to make the best out of every bite. That's why when I use strawberries, in addition to the main recipe, I make strawberry stems syrup. It's super simple and really good on pancakes or to sweeten your cup of jasmine tea.

Here is what I do:

Hull your strawberries, leaving a bit a flesh on the stems and use the fruits in a recipe as you would normally. When you're done hulling the strawberries, place the stems in a plastique bowl or glass jar and cover them with water. Close the jar or bowl and refrigerate for 24 hours. The next day, filter the liquid through a fine mesh and compost the strawberry stems. Measure the volume of flavored water you have obtained. Transfer to a pot and add the same volume of sugar. Bring to a boil and stir to make sure the sugar is well dissolved, then turn off the heat. There you have it, a delicious treat and nothing was wasted! This strawberry syrup will keep in the fridge for several weeks and can be used in many ways! Get creative, pour it over Greek yogurt or in sparkling water.

Strawberry stems simple syrup
.

Sunday, June 5, 2016

Little treasure

I shop at thrift shops all the time. Like really all the time! There's one close to the subway station in my neighborhood and I sometimes go more than once a week. I don't buy things every time... I just take a look at a couple sections I like, mentally going through the ongoing list of things I know I might find and that I would like to buy. Mind you, I often go and drop things too. They're is only so many objects I can actually fit in my apartment! And I'm a big believer in giving a second chance to these things you don't want/need anymore. It's less wasteful and it might very well make somebody happy.

One day, many years ago, I went at a thrift shop that I like on St-Hubert Street. I was looking at some pieces of fabric and I came across three bags of yarn. At that time, I didn't have my fancy taste for natural fibers. I simply liked the colors and it seemed like a good bargain for the size of the bags, 3$ each. When I came home with my finds, I googled the names on the labels. Two of the bags were from Knit Picks (that's actually how I came to know the brand) six or seven balls of Swish in Bordeaux and the same amount of Telemark (now discontinued) in a bright orange color. The third bag was two 250gr skeins of Fleece Artist  Blue Faced Leicester. I was absolutely astonished when I discovered the quality (and actual price for that matter) of my treasure.

The Swish became pairs of socks for my dad and for a friend. The Telemark, some felted house accessories. But the Fleece Artist stayed in my stash for many years untouched. Even though it was my favorite of the three, mostly because of the color, I didn't know what to do with it. The amount was just a little short for a sweater, and it wasn't superwash so I feared not wearing it for I wouldn't want to wash it... At one point I was wondering if I would ever do something with it.  I even thought about selling it. 

Then, I don't know why, it struck me. I would make a shawl from it. Something you wear when it's chilly and you need comfort and warmth. 

http://www.ravelry.com/projects/sweetteasoftskein/kllingesjal-1897recreation-museum-denmark
The pattern I used is Kaellingesjal 1897  by Mette Rørbech.
It is a very warm and cozy tie-shawl. The garter stitch makes for an easy and fast knitting body and the borders add some complexity so it's not boring to knit or to look at.


The piece is really pleasant to wear. Being very stretchy, it stays well in place. 


 It's my first tie-shawl and the only thing I don't like about it is you can't really sit with it. I mean you can, but if your back is against something it's not that comfortable because of the knot. But, this is a recreation based on traditional danish shawl. It was meant for working women and for that it's perfect. That's why I usually wear it around the house when cooking or gardening on chilly days. 


Sunday, August 23, 2015

Binic

It's back to school season! Yaaa! I just got back to work after the summer vacations and I'm already feeling the urge to knit more. Fall is always my most productive season. Cleaning up the garden will be on the priority list pretty soon, and by then I'm surely gonna be thinking about Halloween and Christmas! I can't wait for the cooler days to come. Knitting, wrapped in a blanket, with a nice cup of english breakfast is such a joy to me.

We have had really warm weather in the past month, but it didn't stop my needles. I had told my cousin I would knit something for her little boy (now 18 months old) and so I did. I decided on the Binic Pattern by Solenn Couix-Loarer. It was a quick knit, most of the pattern being worked in round with only knitted stitches. My cousin chose the yarn, Stroll tonal in Pacific. It's such a pleasure working with this yarn. Warm, easy care, springy and so soft! I wish you could touch it through the picture. I'm really eager to see the little guy wear it!

http://www.ravelry.com/projects/sweetteasoftskein/binic


Sunday, June 7, 2015

Teeny tiny thimble purse

I hate standard thimbles. There, I said it. I hate them so much, I used to tape my fingers with masking tape instead of using them. They never seem to fit properly my fingers. They fall off or at least are really unstable.

A couple of months ago, something awesome happened. I discovered open thimbles. They work just like regular thimble. You simply wear them on the tip of the finger you use to push the needle. But what's wonderful about them is, they are adjustable! The front side is a full metal plate with texture to help you push the needle but the back! The back is made of metal bands, that you can squeeze to adjust to the exact size of you finger! I'm done with jiggling thimbles. I've also read that some people like them because they allow you to keep long nails.


The thing is, a thimble is a really small object and as I love mine, I'm afraid to get it lost. It's not worth a lot of money, but I would be disappointed if I had to replace it.
So to protect it, and help me always know where it is, I knitted a tiny bag to tuck it into. It's actually a design from Tiny Owl Knits, with some modifications. Instead of Aran yarn, I used fingering yarn on 2.25mm needles and cut in half all the stitches and row counts. After felting, the tiny purse is only two inches tall (this is without the tassel, that is added later). Finally, I added a drawstring and a glass bead to close it safely.


Teeny tiny purse

Really, this project is a cute and quick knit. I'm happy with the result and even a bit tempted to make the purse in it's original size.

Thursday, February 26, 2015

My first braided rug

As a little girl, I've often seen my grandmother make what she called a "tapis natté". I guess you could translate that by "braided carpet" even though I've seen it more referred to as a rag rug. She used to buy these big balls of synthetic fabric already cut in small stripes. Maybe polyester or rayon, anyway it was kind of shiny on one side. I loved to play with this chunky yarn, especially the small scraps left behind in the end (she kept them in a plastic tub just for the grand kids to play with). My cousin and I were always asked to help when we were home with her. I untangled happily the stripes as she braided them, even braiding them myself sometimes.

 I often wondered where I could find this yarn that she used. I haven't seen any in stores in the recent years. You see, our apartment is somewhat not well isolated and the floors are cold, especially in the kitchen which lead me to think back on those carpets. A big one, right in front of the sink would be perfect, I though to myself...

At the same time, I'm at a point where I'm trying to take control of my craft stash. I need to stop it from growing and keep only what I will use and enjoy crafting with. All of this brought me to try and make my own fabric yarn. As you might know, there are many instructions out there on how to make yarn from old t-shirts and that's exactly what I did. In my humble fabric stash, I have some old clothes that I keep for future sewing projects, many of them were men's t-shirt. The colors weren't so pretty but I also happened to have a couple of dye boxes. So, I started by cutting 5 Large t-shirts in one inch large, long long stripes and dyed them in small batches in an old pot on the stovetop.


This took me quite a while to finish, cutting, dyeing, washing the different colors of stripes. Then, I braided. And braided. And braided! Arranging the colors as the pile of braided yarn grew bigger and bigger. When I had used maybe half of the yarn I had, I laid the braid on the floor. Arranged it as I wanted the rug to look and checking how much more yarn I needed to braided. When I thought I had enough, I started to sew the braid together. I guess you could sew it with a strong machine and heavy thread but I like hand sewing.

Here is the result. It's cozy and It keeps my feet a little warmer when I wash the dishes.


I guess my grandma would be proud of me, reusing old clothes to make something useful and comfy. She did pass me a lot of knowledge and I'm really grateful for that.